唔姆,分享一篇企业里用的阿里云OSS临时签证直传的上传教程

项目地址…springboot+thymeleaf+jquery,简单好用,写博客、做网站专属

1
https://github.com/VampireAchao/ossUpload

一般的阿里云OSS上传,要么放在前端上传,暴露了accesskey和secrekey

要么放在后端,文件先传到后端,再由后端上传,让服务器压力变得巨大。。。

所以,这里一篇服务端签名后直传的教程

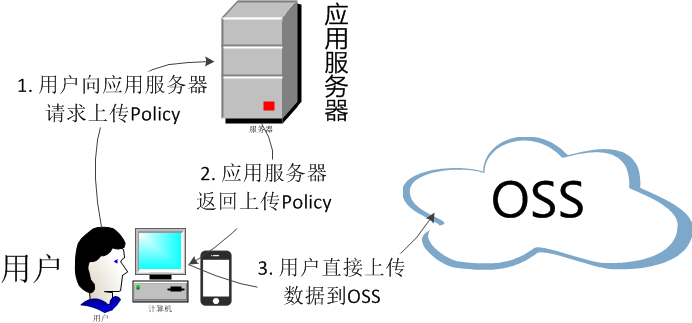
原理

Web端向服务端请求签名,然后直接上传,不会对服务端产生压力,而且安全可靠。但本示例中的服务端无法实时了解用户上传了多少文件,上传了什么文件。

如果想实时了解用户上传了什么文件,可以采用服务端签名直传并设置上传回调

坏处还有就是辛苦了我们的前端同志。。。

首先开通服务

1
2
3
4
5
登录阿里云官网。
将鼠标移至产品,单击对象存储 OSS,打开 OSS 产品详情页面。
在 OSS 产品详情页,单击立即开通。
开通服务后,在 OSS 产品详情页单击管理控制台直接进入 OSS 管理控制台界面。
您也可以单击位于官网首页右上方菜单栏的控制台,进入阿里云管理控制台首页,然后单击左侧的对象存储 OSS 菜单进入 OSS 管理控制台界面。 //从官方文档复制的

创建一个springboot项目,勾选web和thymeleaf(导入js用到了一点)

然后导入依赖

1
2
3
4
5
<dependency>
<groupId>com.alibaba.cloud</groupId>
<artifactId>spring-cloud-starter-alicloud-oss</artifactId>
<version>2.2.0.RELEASE</version> //版本可更改
</dependency>

编写配置

1
2
3
4
5
6
7
8
spring:
cloud:
alicloud:
access-key: ACCESSKEY
secret-key: SECRETKEY
oss:
endpoint: oss-cn-chengdu.aliyuncs.com
bucket: waibi

然后调用,我这里用了个包装类,也一并贴上

1
2
3
4
5
6
7
8
9
10
11
12
13
14
15
16
17
18
19
20
21
22
23
24
25
26
27
28
29
30
31
32
33
34
35
36
37
38
39
40
41
42
43
44
45
46
47
48
49
50
51
52
53
54
55
56
57
58
59
60
61
62
63
64
65
66
67
68
69
70
71
72
73
74
75
76
77
78
79
80
81
82
package com.ruben.service.impl;

import com.aliyun.oss.OSS;
import com.aliyun.oss.common.utils.BinaryUtil;
import com.aliyun.oss.model.MatchMode;
import com.aliyun.oss.model.PolicyConditions;
import com.ruben.common.json.AjaxJson;
import com.ruben.service.UploadService;
import org.springframework.beans.factory.annotation.Value;
import org.springframework.stereotype.Service;

import javax.annotation.Resource;
import java.text.SimpleDateFormat;
import java.util.Date;
import java.util.LinkedHashMap;
import java.util.Map;

/**
* @ClassName: UploadServiceImpl
* @Description: 获取OSS签证
* @Date: 2020/6/3 21:55
* *
* @author: achao<achao1441470436 @ gmail.com>
* @version: 1.0
* @since: JDK 1.8
*/
@Service
public class UploadServiceImpl implements UploadService {

@Resource
OSS ossClient;

@Value("${spring.cloud.alicloud.oss.endpoint}")
private String endpoint;
@Value("${spring.cloud.alicloud.oss.bucket}")
private String bucket;
@Value("${spring.cloud.alicloud.access-key}")
private String accessId;

/**
* 获取临时签证
* @return
*/
@Override
public AjaxJson getMark() {
String host = "https://" + bucket + "." + endpoint; // host的格式为 bucketname.endpoint
// callbackUrl为 上传回调服务器的URL,请将下面的IP和Port配置为您自己的真实信息。
// String callbackUrl = "http://88.88.88.88:8888";
String format = new SimpleDateFormat("yyyy-MM-dd").format(new Date());
String dir = format + "/"; // 用户上传文件时指定的前缀。
Map<String, String> respMap = null;
try {
long expireTime = 3000;
long expireEndTime = System.currentTimeMillis() + expireTime * 1000;
Date expiration = new Date(expireEndTime);
PolicyConditions policyConds = new PolicyConditions();
policyConds.addConditionItem(PolicyConditions.COND_CONTENT_LENGTH_RANGE, 0, 1048576000);
policyConds.addConditionItem(MatchMode.StartWith, PolicyConditions.COND_KEY, dir);

String postPolicy = ossClient.generatePostPolicy(expiration, policyConds);
byte[] binaryData = postPolicy.getBytes("utf-8");
String encodedPolicy = BinaryUtil.toBase64String(binaryData);
String postSignature = ossClient.calculatePostSignature(postPolicy);

respMap = new LinkedHashMap<String, String>();
respMap.put("accessid", accessId);
respMap.put("policy", encodedPolicy);
respMap.put("signature", postSignature);
respMap.put("dir", dir);
respMap.put("host", host);
respMap.put("expire", String.valueOf(expireEndTime / 1000));
// respMap.put("expire", formatISO8601Date(expiration));
} catch (Exception e) {
// Assert.fail(e.getMessage());
System.out.println(e.getMessage());
} finally {
ossClient.shutdown();
}
return AjaxJson.success("获取签证成功!").put("data", respMap);
}
}

1
2
3
4
5
6
7
8
9
10
11
12
13
14
15
16
17
18
19
20
21
22
23
24
25
26
27
28
29
30
31
32
33
34
35
36
37
38
39
40
41
42
43
44
45
46
47
48
49
50
51
52
53
54
55
56
57
58
59
60
61
62
63
64
65
66
67
68
69
70
71
72
73
74
75
76
77
78
79
80
81
82
83
84
85
86
87
88
89
90
91
92
93
94
95
96
97
98
/**
* Copyright &copy; 2015-2020 <a href="http://www.jeeplus.org/">JeePlus</a> All rights reserved.
*/
package com.ruben.common.json;

import com.fasterxml.jackson.annotation.JsonIgnore;
//import com.jeeplus.core.mapper.JsonMapper;
import org.springframework.http.HttpStatus;

import java.io.Serializable;
import java.util.HashMap;
import java.util.Map;


/**
* $.ajax后需要接受的JSON
*
* @author
*
*/
public class AjaxJson extends HashMap<String,Object> implements Serializable {


public AjaxJson(){
this.put("success", true);
this.put("code", HttpStatus.OK.value());
this.put("msg", "操作成功");
}

public String getMsg() {
return (String)this.get("msg");
}

public void setMsg(String msg) {//向json中添加属性,在js中访问,请调用data.msg
this.put("msg", msg);
}


public boolean isSuccess() {
return (boolean)this.get("success");
}

public void setSuccess(boolean success) {
this.put("success", success);
}

/* @JsonIgnore//返回对象时忽略此属性
public String getJsonStr() {//返回json字符串数组,将访问msg和key的方式统一化,都使用data.key的方式直接访问。

String json = JsonMapper.getInstance().toJson(this);
return json;
}*/
@JsonIgnore//返回对象时忽略此属性
public static AjaxJson success(String msg) {
AjaxJson j = new AjaxJson();
j.setMsg(msg);
return j;
}
@JsonIgnore//返回对象时忽略此属性
public static AjaxJson error(String msg) {
AjaxJson j = new AjaxJson();
j.setSuccess(false);
j.setMsg(msg);
return j;
}

public static AjaxJson success(Map<String, Object> map) {
AjaxJson restResponse = new AjaxJson();
restResponse.putAll(map);
return restResponse;
}

public static AjaxJson success() {
return new AjaxJson();
}


@Override
public AjaxJson put(String key, Object value) {
super.put(key, value);
return this;
}

public AjaxJson putMap(Map m) {
super.putAll(m);
return this;
}

public int getCode() {
return (int)this.get("code");
}

public void setCode(int code) {
this.put("code", code);
}

}

顺便一提,这个包装类是jeeplus的,若本教程存在任何侵权问题,请联系我删除…

controller里就很简单,就一个方法

1
2
3
4
5
6
7
8
9
10
11
12
13
14
15
16
17
18
19
20
21
22
23
24
25
26
27
28
29
30
31
32
33
34
35
36
37
package com.ruben.controller;

import com.ruben.common.json.AjaxJson;
import com.ruben.service.UploadService;
import org.springframework.web.bind.annotation.GetMapping;
import org.springframework.web.bind.annotation.RequestMapping;
import org.springframework.web.bind.annotation.RestController;

import javax.annotation.Resource;

/**
* @ClassName: UploadController
* @Description: 文件上传controller
* @Date: 2020/6/3 21:53
* *
* @author: achao<achao1441470436 @ gmail.com>
* @version: 1.0
* @since: JDK 1.8
*/
@RestController
@RequestMapping("oss")
public class UploadController {

@Resource
UploadService uploadService;

/**
* 获取签证
*
* @return
*/
@GetMapping("getMark")
public AjaxJson getMark() {
return uploadService.getMark();
}
}

然后是前端的页面,记得导入thymeleaf

1
2
3
4
5
6
7
8
9
10
11
12
13
14
15
16
17
18
19
20
21
22
23
24
25
26
27
28
29
30
31
32
<!DOCTYPE html>
<html lang="en" xmlns:th="http://www.thymeleaf.org">
<head>
<meta charset="UTF-8">
<title>upload</title>
<script type="application/javascript" th:src="@{/js/upload.js}"></script>
<script type="text/javascript" src="https://apps.bdimg.com/libs/jquery/2.1.4/jquery.min.js"></script>
</head>
<body>
<input type="file" id="uploadFile" multiple="multiple">
<script>
var firstShowImgs = true; //是否第一次调用setShowFiles()这个函数
// uploadFile input 框回调拿到的file对象

$('#uploadFile').change(function (e) {
// console.log(e.target.files);
var uploadFile=e.target.files;
var files=[];
for(var i=0;i<uploadFile.length;i++){ //循环push包装一下file对象
files.push({
returnShow: false, //当前图片是否上传完成
url: '', //url 地址
file: uploadFile[i], //file 对象
isDel:false //是否删除
})
}
console.log(files);
setShowFiles(0,files);
});
</script>
</body>
</html>

PS:前端页面是让同事帮忙写的,自己JQuery忘完了,记得导入js

1
2
3
4
5
6
7
8
9
10
11
12
13
14
15
16
17
18
19
20
21
22
23
24
25
26
27
28
29
30
31
32
33
34
35
36
37
38
39
40
41
42
43
44
45
46
47
48
49
50
51
52
53
54
55
56
57
58
59
60
61
62
63
64
65
66
67
68
69
70
71
72
73
74
75
76
77
78
79
80
81
82
83
84
85
86
87
88
89
90
91
92
93
94
95
96
97
98
99
100
101
102
103
104
105
106
107
108
109
110
111
112
113
114
115
116
117
118
119
120
121
122
123
124
125
126
127
128
129
130
131
132
133
134
135
136
137
138
139
140
141
142
143
144
145
146
147
148
149
150
151
152
153
154
155
156
157
158
159
160
161
162
163
164
165
166
167
168
169
170
171
172
173
174
175
176
177
178
179
180
181
182
183
184
185
186
187
188
189
190
191
192
193
const baseUrl = 'http://localhost:8080';

const utils = {
getUUID() { //生成UUID
return 'xxxxxxxx-xxxx-4xxx-yxxx-xxxxxxxxxxxx'.replace(/[xy]/g, c => {
return (c === 'x' ? (Math.random() * 16 | 0) : ('r&0x3' | '0x8')).toString(16)
})
},
getSuffix(fileName) { //获取文件后缀名
var first = fileName.lastIndexOf(".");//取到文件名开始到最后一个点的长度
var namelength = fileName.length;//取到文件名长度
var filesuffix = fileName.substring(first + 1, namelength);//截取获得后缀名
return `.${filesuffix}`
},
getfileName(fileName) { //获取文件名(不要后缀)
var first = fileName.lastIndexOf(".");//取到文件名开始到最后一个点的长度
var filesuffix = fileName.substring(0, first);//截取获得文件名
return `${filesuffix.replace(/\s/g, "")}`
},
getFileUrlName(fileName) { //获取文件路径名称
var first = fileName.lastIndexOf("/");//取到文件名开始到最后一个/的长度
var namelength = fileName.length;//取到文件名长度
var filesuffix = fileName.substring(first + 1, namelength);//截取获得文件名
return `${filesuffix}`
},
getObjectURL(file) { //返回文件本地路径
var url = null;
if (window.createObjectURL != undefined) {
url = window.createObjectURL(file);
} else if (window.URL != undefined) {
url = window.URL.createObjectURL(file);
} else if (window.webkitURL != undefined) {
url = window.webkitURL.createObjectURL(file);
}
return url;
}
}


function request(url, type, params = {}) {
if (type == "URL_GET") {
// console.log(params.url);

url = url + '/' + params.url.join('/');
delete (params['url']);
type = 'GET';
} else if (type == "URL_POST") {
url = url + '/' + params.url.join('/');
delete (params['url']);
type = 'POST';
}

if (localStorage.getItem('token') && localStorage.getItem('refreshToken')) {
params['headers'] = {//携带token
"apiToken": localStorage.getItem('token'),
"apiRefreshToken": localStorage.getItem('refreshToken')
};
}
if (params['data'] && type == "POST") {
params['data'] = JSON.stringify(params['data']);
}

return new Promise(function (resolve, reject) {
$.ajax({
url: baseUrl + url,
type: type,
...params,
contentType: 'application/json; charset=UTF-8',
success: function (res) {
if (res.code == 200) {
resolve(res)
} else {

}
},
error: function (res) {
reject(res)
}
});
})
}

function aliOssUploadFile(obj = {}) {
// alert(obj);
http.getOssInfo().then((res) => {
if (res.code == 200 && res.success == true) {
var config = res.data;
var formData = new FormData();
var filesAddress = `${config.dir}${utils.getfileName(obj.name)}-${utils.getUUID()}-${+new Date()}${utils.getSuffix(obj.name)}`;
formData.append('key', filesAddress); //存储在oss的文件路径
formData.append('ossaccessKeyId', config.accessid); //accessKeyId
formData.append('policy', config.policy); //policy
formData.append('Signature', config.signature); //签名
formData.append("file", obj.file);
formData.append("dir", config.dir);
formData.append('success_action_status', 200); //成功后返回的操作码
$.ajax({
type: 'POST',
data: formData,
url: config.host,
processData: false,
contentType: false,
async: true,
xhr: function () {
myXhr = $.ajaxSettings.xhr();
if (myXhr.upload) { // check if upload property exists
myXhr.upload.addEventListener('progress', (e) => {
var loaded = e.loaded; //已经上传大小情况
var total = e.total; //附件总大小
var percent = Math.floor(100 * loaded / total) + "%"; //已经上传的百分比
// console.log("已经上传了:"+percent);
obj.success({
meCode: 201,
data: {total, loaded, percent: percent, num: Math.floor(100 * loaded / total)}
})
}, false); // for handling the progress of the upload
}
return myXhr;
},
success: (res) => {
obj.success({meCode: 200, data: {url: config.host + '/' + filesAddress}})
},
error: (err) => {
console.log(err);
obj.error({code: 200, success: false, msg: 'oss上传文件失败', data: err})
}
})
} else {
obj.error(res);
}
}).catch((err) => {
obj.error({code: 200, success: false, msg: '获取oss签证失败', data: err});
})
}

const http = {
uploadFile: aliOssUploadFile, //阿里云oss上传文件
getOssInfo: (params) => request('/oss/getMark', 'GET', params), //获取oss信息
}


// var firstShowImgs = true; //是否第一次调用setShowFiles()这个函数
// uploadFile input 框回调拿到的file对象
// for(var i=0;i<uploadFile.length;i++){ //循环push包装一下file对象
// files.push({
// returnShow: false, //当前图片是否上传完成
// url: utils.getObjectURL(uploadFile[i]), //url 地址
// file: uploadFile[i], //file 对象
// isDel:false //是否删除
// })
// }


// setShowFiles(0,files);

function setShowFiles(index, files) { //循环多文件上传
if (index > files.length - 1) { //结束递归
console.log(files);
var arrImg = [];
files.forEach(item => {
if (item.returnShow == true && !item.isDel) {
arrImg.push(item.url);
item.isDel = true;
}
});
console.log(arrImg); //结束递归时返回所有上传成功的url数组
firstShowImgs = true; //改为初始值。
return false
}
if (files[index].returnShow || files[index].isDel) {
setShowFiles(index - 0 + 1, files); //递归下一个
return false
}
http.uploadFile({ //上传
file: files[index].file, //文件
name: files[index].file.name, //文件名称
success: (res) => { //成功返回
if (res.meCode == 200) { //成功
files[index].returnShow = true;
files[index].url = res.data.url;
setShowFiles(index - 0 + 1, files); //递归
}
},
error: (err) => { //失败返回
files[index].isDel = true; //,当前图片上传失败后改为删除状态就不得再次上传
setShowFiles(index - 0 + 1, files); //递归下一个
console.log(err);
}
})
}

然后把文件拖到上传按钮那里就上传了,路径拼到了控制台打印出来了

之后可以传到服务端保存到数据库里,这样就完成了保存路径的操作